
I don’t know about you, but hung print jobs are the bane of my Windows existence. Have you ever had the “canceling . . .” message that just won’t go away? If you have, there is a simple way to purge your Windows print jobs, using a batch file.
I don’t know about you, but hung print jobs are the bane of my Windows existence. Have you ever had the “canceling . . .” message that just won’t go away? If you have, there is a simple way to purge your Windows print jobs, using a batch file.
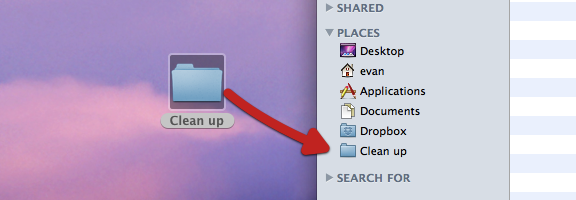
If, like me, you’re relatively new to the Mac world, you stumble across tips that are both incredibly useful, and incredibly simple. One such tip concerns how to add folders to your Finder sidebar. There are several reasons you might want to do this. Perhaps you have a folder that you access all of the time, and don’t want to go digging for it. Or perhaps you’re in the middle of a project, and want to temporarily access your project folders with one click. Getting those folders into the Places section of your Finder sidebar is easy, using either of two methods.

Yesterday, we asked you how much disk space you’ve used up on your system. On a Windows 7 PC, some of that space can be taken up by Service Pack 1 backup files that you might never need. When you install Service Pack 1 for Windows 7, it creates backup files in case you have problems and ever need to uninstall the service pack. You can remove them, though, if you want to. Here’s how.

Windows 7 is likely the best operating system Microsoft has ever put out. Oh, I’m sure some of you die-hards out there will still swear up and down that it’s Windows 98, 2000, or even 3.1 — and you Mac folk can just go ahead and tamp down on those comments bubbling to the surface of your elitist brains right about now — but when you consider the mix of power, beauty, and function, Billy Gates and crew have finally hit the sweet-spot with their latest OS.
One of the greatest things about Windows 7 is the customizability; there are a lot of different things that you can do with it to improve your overall user experience. Some of those things are fairly obvious, and some are a bit of a surprise, but many can be done quickly and easily, even by the non-techie, sometimes with the help of a handy tool or two. This series focuses on some tweaks for personalizing your own Windows 7 setup with as little fuss as possible. Let’s start off with the hidden themes that are just hanging about in your Windows folder.
You probably already know that there are several theme-sets that you can apply in Windows 7 with little more than a click, but on the off-chance that you didn’t, head into the Control Panel, look for Appearance and Personalization, and select “Change the theme.” You can also right-click on the desktop and select Personalize from the context menu.
Once inside, you’ll find all of your pre-installed themes, and you can even create and save your own. What you may not have realized is that, depending on your Windows version, you could have anywhere from five to a dozen or more other themes hidden on your system, just waiting for you to find and install them!

You may have noted that, in the pre-installed themes, one of the ones under Aero Themes is named for your country — I have one called Canada. What most don’t realize is that, skulking about in a hidden folder, are themes from other countries as well. Some of them are quite nice, too, containing wallpapers that have beautiful scenes from each respective country. Here’s how you find them:

As the theme is installed, your Control Panel will also open up to the Appearance and Personalization settings, and you will notice the new country theme under your My Themes section. If you want to change away from the new theme, simply click on a different one or install one for a different country. Once the theme you just installed is inactive, if you want to get rid of it, simply right-click on it and select delete. You can always reinstall it later.
Over the next few weeks, we will be posting other simple tweaks and tricks for personalizing your Windows 7 installation, as well as looking at some of the tools out there that help you out in the process. If you have any you would like to suggest, leave a comment, catch me on Twitter (@bobby_travis), or send me an email from my 40Tech contact page.
What countries were in your hidden themes folder?

The beautiful thing about Android OS, over iOS, is the open platform. The annoying (and potentially dangerous) thing about Android OS, over iOS, is… wait for it… the open platform. It’s a double-edged sword. Say what you want about Apple’s proprietary madness, but the likelihood of a scam or malware app making it through to the iOS App Store is pretty slim — at least in comparison to Google’s Android Market. Does this mean you should never buy Android and jump headfirst into Apple products? By no means! According to the learned fellows over at Tested.com, with a little common sense, some permissions checking, and a dose of healthy skepticism, you can avoid the sneaky apps. Here are the main points:
Check the user reviews on Android Market. Go deeper than the first page. Read them — if there are a ton of positive reviews and they have the same sort of feel to them (like they were written by the same person, for instance), there is probably something up. If there are a ton of negative reviews, there is probably a reason — no matter who wrote them.
View the other apps submitted to the Market by the developer. If there are a string of oddities and things that make you raise a brow or two, you might want to avoid the app you are researching.
Check the developer’s website and support site. If the sites leave you feeling uneasy or that the developer lacks professionalism, you may wish to think twice before purchasing anything by them.
Check the app permissions. This is the big one. If an app has the ability to modify/delete SD card contents, to send a text message or MMS, or to access the internet all willy-nilly and you don’t know why, treat it in the same way you would a Windows application that is trying to do things that don’t make sense: don’t install/remove it, research it, and find out exactly what it’s doing. If the developer isn’t completely clear and forthcoming, get rid of it.
You can research permissions before you install an app by going to the app’s Market page and selecting menu, then security. Once an app is installed, check the permissions in Manage Application Settings.
There are more details of what you can look for via the link below.
How do you keep yourself safe from malware apps and scams on the Android Market?